
Windows Operating System


|
Viewing Contents of Drives or Folders Copying, Moving, Renaming or Deleting Files/Folders |
|
- Click on My
Computer.
 Click on Local Disk C.

Viewing Contents of Drives and Folders 
Left Pane (used to navigate to a certain location)
Note: In the left pane you will never see actual files, only drives or folders.
- Click once on a drive or folder to see the contents appear in the right pane.
- To
expand a branch of the tree structure, click
on the plus sign
 to the left of the desired drive or folder.
(The right pane will not change.)
to the left of the desired drive or folder.
(The right pane will not change.)
- Double clicking on a non expanded drive or folder in the left pane = both, expanding the branch and viewing contents of that drive or folder in the right pane.
- To
retract a branch of the tree structure that is
already expanded, click on the minus sign
 to the left of the desired drive or folder.
- Double clicking on an expanded drive or folder in the left pane = both, retracting the branch and viewing the contents of that drive or folder in the right pane.
Right Pane (provides various file management options).
In the right pane you will see any contents of the folder which is highlighted in the left pane.
Contents can be:
- sub folders of the highlighted drive or folder on the left
- any files contained in this specific folder.
- Double clicking (in the right hand pane) on a folder opens that folder's contents and re-adjusts the left pane window to reflect which folder is open.
- Double clicking on an actual file name will open that file (provided your computer contains the software necessary).
Open the Windows Explorer and navigate in the left and right pane
- Use the scroll bars to move around.
- Single click on a drive in the left pane.
- Single click on a folder in the left pane.
- Click on a plus sign to the left of a drive or folder.
- Click on a minus sign to the left of a drive or folder.
- Double click on folders in the left window.
In the Right Pane, you can choose the way the folders and files are displayed.
- In the menu bar, click on View and then on Large Icons, Small Icons, List or Details
- Optionally,
you can click on the Views button
 in the button bar. Clicking on the button simply toggles
through the options. Clicking on the down arrow to the right of
the button shows the various options.
in the button bar. Clicking on the button simply toggles
through the options. Clicking on the down arrow to the right of
the button shows the various options.
- Details is the view which gives the most information.
- Clicking
and Dragging
- In the left pane select the desired drive or folder.
- Once the drive or folder is selected, in the right hand pane, click and drag the mouse around the desired files to select them. Note: Changing the View sometimes makes this task easier.
- Using the Left Pane, navigate to the drive or folder into which you want to place the sub folder. Click on that drive or folder to reveal its contents in the right pane.
- In the Right Pane, right click anywhere in an empty area. (not on an actual file or folder)
- From the menu that appears choose New and then Folder
- A folder will appear with the name "New Folder". New Folder will be highlighted and allows you to retype another name of your choosing.
- Once
the new name for the folder is entered, click outside the folder.
- If you make a mistake on the name, right click on the folder and choose Rename from the menu that appears. You will now be able to make corrections.
Copying, Moving, Renaming or Deleting Files/Folders
Copying or Moving Files or Folders: Various methods can be used to copy or move files or folders.
- Copy
or Cut and Paste
- In the right pane, make sure the desired files are selected.
- Once selected, right click anywhere on the selected files.
- Choose Copy (CTRL+C is a shortcut key) to make a copy in a new location or Cut (CTRL+X is a shortcut key) to move the files to a new location.
- Now using the left and right panes, navigate to the desired location where the files are to be placed.
- In the right pane of the desired location, Right click on an empty area of the pane, (not on a file or folder) and choose Paste (CTRL+V is a shortcut key). The files and folders that you copied or cut will be pasted here.
-
Clicking and Dragging to Copy or Move files
- In the right pane, make sure the desired files are selected.
- In
the left pane, navigate in such a way that the drive or folder,
to which you wish to copy the files, is visible. Use
the Plus
and Minus
signs to find folders you can't see.
- In the right pane, left click, on the selected files and drag (hold the left mouse button and move the mouse) the files to the desired folder in the left pane.
Renaming Files/Folders
- Right click on the file or folder which is to be renamed.
- Choose Rename from the menu.
- Type a new name in the title area of the folder or file.
- Click outside the file or folder area.
Deleting Files
- In the right pane, select the file(s)/folders to be deleted.
- There
are several ways to delete, once the files/folders are selected.
- Right click on the selected file(s)/folders and choose Delete from the menu that appears.
- Click
the Delete button
 in the button bar.
 - Press the Delete Key on the keyboard
- Drag and drop the files/folders into the Recycle Bin.
- These files go to the Trash Bin and could be restored from there if desired. Once the trash bin is emptied, the files are gone. Attention: When you delete a folder, you delete all files in that folder. Before deleting a folder, be sure that it does not contain files you wish to keep!
At times when you manipulate files in a folder or drive, the file or folder list may not reflect or show the changes. The file you thought you copied does not show up in the list. At times such as these you can use refresh to have the computer update the window to properly reflect the changes. To refresh...
- right click on an empty area of the right pane or
- in the menu bar at the top of the window, click on View/Refresh
- Right pane, right click in an empty area
- Right
pane, right click on a file or folder
- Open with...
- Cut, Copy, Delete, Rename
- File Properties: file name, size, location
Windows was designed to mimic an office working environment. Normally in your office you have a desk and filing cabinet. The desktop is used to contain the files and folders on which you are currently working or which you use often. This is the same for Windows. Normally the desktop contains Shortcuts to files and folders which are in use currently or which are often accessed. Putting them on the desktop gives easy access to these.
- Shortcuts: pointers to other files or folders.
- Shortcuts
are distinguished from actual files and folders by a small arrow
on the icon.
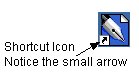
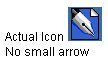
- Shortcuts can be deleted without deleting the actual file or folder to which it points.
- When you delete an actual icon, the file or folder is deleted.
- To create shortcuts for a file or folder, in the right pane of Windows Explorer, right click on the desired file or folder and select Create Shortcut. The shortcut is created in the same folder as the icon from which the shortcut is created.
- To place the shortcut in another location, the Desktop for example, click and drag the shortcut to the desired location.
- Create a shortcut for one of each of the test files in the three folders just created.
- Drag each of these shortcuts to the Desktop.
- Delete each of these shortcuts from the Desktop.
Searching for Files or Folders
The Windows Explorer allows us to search for files or folders that we have lost.
- Depending
on the version of Windows, this option appears in various places.
- Click on the Search Button in the button bar or click on Edit/Search.
There are literally thousands of tutorials on Windows Explorer on the Internet.
- This
is a great site where people consult Q/A about Files/Drives/Folders
etc.
- Free
online Windows 98 tutorial
http://www.baycongroup.com/win98/windows_98.htm
- Free
online Windows 98 tutorial
E-mail Management
- Setting up an account with hotmail.com
- Attaching files.
- cc and bcc.
- Attaching files.
- Photos
- Saving photos and files (right-click to a location).
- Navigating to photo or file.
- E-mailing photos and files.
- Navigating to photo or file.
- Saving photos and files (right-click to a location).
